Getting Skins Into rFactor 2
For some fucked up gay stupid drunk idiot faggot communist retard reason, ISI decided to make getting skins into RFactor2 batshit fucking pants-on-head idiotically fucking difficult. Here's a quick guide on getting your shit to show up in game.
NOTE: This guide does not cover painting and exporting. That process is essentially the same as it is for rFactor Skinning.
Getting Your Car In Game
Firstly, make sure you've exported your skin in the correct format (.dds) with the correct options (same options as rF1 - see link above).
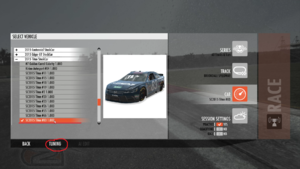
Okay first thing's first: Fire up rFactor 2 singleplayer. With the current mod set to "All Tracks & Cars" Now navigate to an already installed make and model car that you are making the skin for. Highlight this car and click "Tuning" (Fig. 1)

| |
| Fig. 1 | |
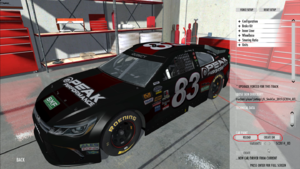
Now in the tuning menu, click the "Create Dir" button near the bottom right of the screen. This will create a folder at the path shown under "Loose Skin Directory" (Fig. 2). NOTE: This will either be located in your My Documents\rFactor 2\ folder or in the drive you installed the game to, depending on which option you chose during installation.

| |
| Fig. 2 | |
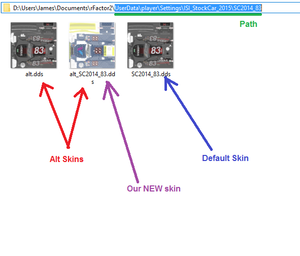
Alt-Tab out of or exit rFactor 2. Navigate to the folder you just created (UserData\player\Settings\ISI_StockCar_2015\SC2014_83 in our example). Now copy and paste the NEW skin that you wish to make into a NEW car into this folder. The filename can be named anything you want it to be, but it must have "alt" either at the beginning or the end of the filename or it won't show up (Fig. 3). This is because ISI are apparently fucking stupid. Quick note about filenames: the default skins in these folders (the one without "alt" in the filename) are hardcoded into the game elsewhere in the file structure. The .dds you see in this folder was generated when you created the directory. Its merely a copy of the skin that car uses by default and cannot be edited or removed by replacing or deleting it from this folder.

| |
| Fig. 3 | |
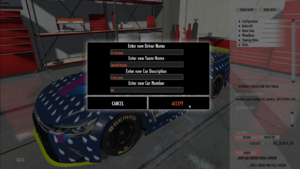
Bring rFactor 2 back up. If you merely alt-tabbed out of game, click the "reload" button in the tuning window. If you exited the game, navigate back to the car where you generated the directory. Now click the arrows labeled "variants" until your new skin shows up on the car. Now click the "Create" button at the very bottom of the screen (NOT "create dir"!). A menu will pop up asking for inputs. This is where you will input your driver and team name, your car description, and car number. Do this and click accept (Fig. 4). If you are submitting this skin for a series, copy down whatever you input into these field word-for-word and send them along with your skin.

| |
| Fig. 3 | |
If you back out to the car selection menu, you should now see your new, standalone car with your skin set as the default. If it does not show up in the menu, exit and restart rF2.